How to make Cut Copper in Minecraft
This Minecraft tutorial explains how to craft cut copper with screenshots and step-by-step instructions.
In Minecraft, cut copper is a new type of block that was introduced in the Caves & Cliffs Update: Part I. The crafting process will create 4 cut copper at a time.

Let's explore how to make cut copper.
Supported Platforms
Cut copper is available in the following versions of Minecraft:
| Platform | Supported (Version*) |
|---|---|
| Yes (1.17) | |
| Yes (1.17.0) | |
| No | |
| Yes (1.17.0) | |
| No | |
| Yes (1.17.0) | |
| No | |
| Yes (1.17.0) | |
| Yes (1.17.0) | |
| Yes (1.17.30) |
* The version that it was added or removed, if applicable.
NOTE: Pocket Edition (PE), Xbox One, PS4, Nintendo Switch, and Windows 10 Edition are now called Bedrock Edition. We will continue to show them individually for version history.
4 Stages of how Cut Copper ages
In Minecraft, cut copper naturally ages in 4 different stages.
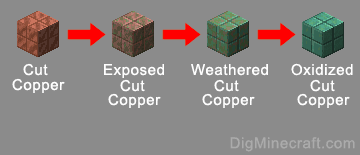
At each stage, the color/appearance of the cut copper changes as does the block name. Here are the 4 stages of cut copper aging:
| Aging | Block | Appearance |
|---|---|---|
| First Stage | Shiny brown | |
| Second Stage | Brown with green flecks | |
| Third Stage | Green with brown flecks | |
| Fourth Stage | Green |
As the cut copper ages, the block changes from cut copper (which is a shiny brown) into exposed cut copper (which is brown with green flecks). Next, the exposed cut copper turns into weathered cut copper (which is green with brown flecks). Finally, weathered cut copper turns into oxidized cut copper (which is a solid green color).
Where to find Cut Copper in Creative Mode
- Java
- PE
- Xbox
- PS
- Nintendo
- Win10
- Edu
Minecraft Java Edition (PC/Mac)
Here is where you can find cut copper in the Creative Inventory menu:
| Platform | Version(s) | Creative Menu Location |
|---|---|---|
| 1.17 - 1.20 |
Minecraft Pocket Edition (PE)
Here is where you can find cut copper in the Creative Inventory menu:
| Platform | Version(s) | Creative Menu Location |
|---|---|---|
| 1.17.0 - 1.20.0 |
Minecraft Xbox Editions
Here is where you can find cut copper in the Creative Inventory menu:
| Platform | Version(s) | Creative Menu Location |
|---|---|---|
| 1.17.0 - 1.20.0 |
Minecraft PS Editions
Here is where you can find cut copper in the Creative Inventory menu:
| Platform | Version(s) | Creative Menu Location |
|---|---|---|
| 1.17.0 - 1.20.0 |
Minecraft Nintendo
Here is where you can find cut copper in the Creative Inventory menu:
| Platform | Version(s) | Creative Menu Location |
|---|---|---|
| 1.17.0 - 1.20.0 |
Minecraft Windows 10 Edition
Here is where you can find cut copper in the Creative Inventory menu:
| Platform | Version(s) | Creative Menu Location |
|---|---|---|
| 1.17.0 - 1.20.0 |
Minecraft Education Edition
Here is where you can find cut copper in the Creative Inventory menu:
| Platform | Version(s) | Creative Menu Location |
|---|---|---|
| 1.17.30 |
Required Materials to make Cut Copper
In Minecraft, these are the materials you can use to craft cut copper:

How to craft Cut Copper in Survival Mode
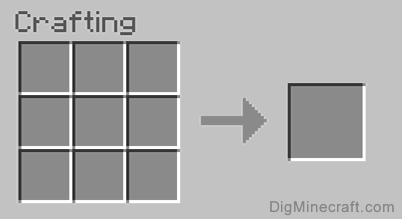
1. Open the Crafting Menu
First, open your crafting table so that you have the 3x3 crafting grid that looks like this:
2. Add Items to make Cut Copper
In the crafting menu, you should see a crafting area that is made up of a 3x3 crafting grid. To make cut copper, place 4 copper block in the 3x3 crafting grid.
When making cut copper, it is important that the copper blocks are placed in the exact pattern as the image below. In the first row, there should be 1 copper block in the first box and 1 copper block in the second box. In the second row, there should be 1 copper block in the first box and 1 copper block in the second box. This is the Minecraft crafting recipe for cut copper.
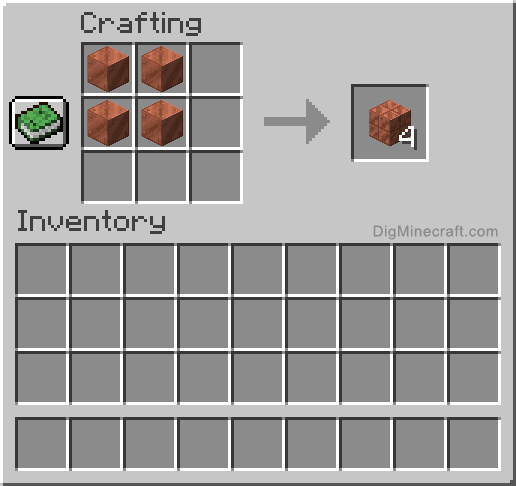
Now that you have filled the crafting area with the correct pattern, the 4 cut copper will appear in the box to the right.
3. Move the Cut Copper to Inventory
Once you have crafted cut copper, you need to move the new items to your inventory.
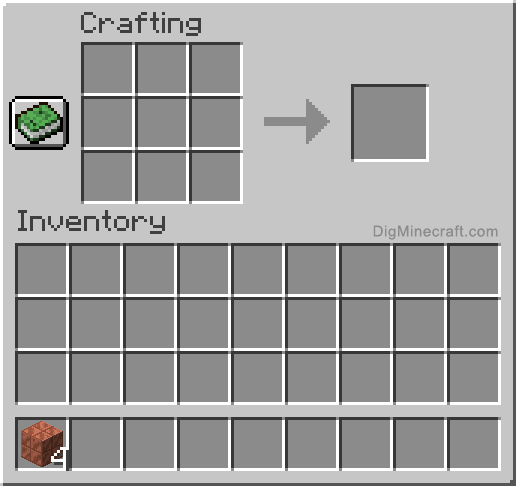
Congratulations, you have made cut copper in Minecraft!
Item ID and Name
- Java
- PE
- Xbox
- PS
- Nintendo
- Win10
- Edu
Minecraft Java Edition (PC/Mac)
In Minecraft, cut copper has the following Name, ID and DataValue:
| Description (Minecraft ID Name) |
Data Value | Stack Size | Platform | Version(s) |
|---|---|---|---|---|
| Cut Copper (minecraft: |
64 | 1.17 - 1.20.3 |

Minecraft Pocket Edition (PE)
In Minecraft, cut copper has the following Name, ID and DataValue:
| Description (Minecraft ID Name) |
Data Value | Stack Size | Platform | Version(s) |
|---|---|---|---|---|
| Cut Copper (minecraft: |
0 | 64 | 1.17.0 - 1.20.50 |
Minecraft Xbox One
In Minecraft, cut copper has the following Name, ID and DataValue:
| Description (Minecraft ID Name) |
Data Value | Stack Size | Platform | Version(s) |
|---|---|---|---|---|
| Cut Copper (minecraft: |
0 | 64 | 1.17.0 - 1.20.50 |
Minecraft PS4
In Minecraft, cut copper has the following Name, ID and DataValue:
| Description (Minecraft ID Name) |
Data Value | Stack Size | Platform | Version(s) |
|---|---|---|---|---|
| Cut Copper (minecraft: |
0 | 64 | 1.17.0 - 1.20.50 |
Minecraft Nintendo Switch
In Minecraft, cut copper has the following Name, ID and DataValue:
| Description (Minecraft ID Name) |
Data Value | Stack Size | Platform | Version(s) |
|---|---|---|---|---|
| Cut Copper (minecraft: |
0 | 64 | 1.17.0 - 1.20.50 |
Minecraft Windows 10 Edition
In Minecraft, cut copper has the following Name, ID and DataValue:
| Description (Minecraft ID Name) |
Data Value | Stack Size | Platform | Version(s) |
|---|---|---|---|---|
| Cut Copper (minecraft: |
0 | 64 | 1.17.0 - 1.20.50 |
Minecraft Education Edition
In Minecraft, cut copper has the following Name, ID and DataValue:
| Description (Minecraft ID Name) |
Data Value | Stack Size | Platform | Version(s) |
|---|---|---|---|---|
| Cut Copper (minecraft: |
0 | 64 | 1.17.30 - 1.18.32 |
Give Command for Cut Copper
Things to Make with Cut Copper
You can use cut copper to make items in Minecraft such as:


Other Stages of Cut Copper
There are different stages of cut copper (based on aging) in Minecraft such as:


Advertisements